Several months later after the environment is in production, they now want to allow external access...go figure :)
There were several issues here: we have a one-arm Kemp virtual load balancer installed on the internal LAN; the firewall/security team didn't want to NAT anything internally (they will only NAT to the DMZ); NATing to the DMZ requires another load balancer (costing more money) or a reverse proxy solution, which would then have to redirect back to the internal Kemp...not a graceful solution.
I decided that it would save a ton of trouble just switching the existing Kemp from a one-arm config to a two-arm.
Meaning, it will have one NIC in the internal LAN, and one NIC in the DMZ thereby allowing both internal and external client connections.
The steps are pretty straightforward and some of the things will be specific to your environment.
**Disclaimer** You should not perform this on a production environment as it can result in loss of client connections...but if you have no choice, go for it!
**Note** You should take a back up the current config before starting the changes.
**Note** You will have to restart the load balancer during the changes, so it's best to do this outside business hours.
Changing a One-Arm Kemp LoadMaster to a Two-Arm Configuration:
First, you'll need to add a second NIC to your load balancer VM and assign it to another network, such as your DMZ.
In my case, I already had two NICs defined (eth0 and eth1) but eth1 wasn't being used, so I set the DMZ network on that one.
My initial setup was eth0 on the internal 10.x.69.x network, which allowed only internal connections.
Now, I've added the DMZ network to eth1, which is on the 10.x.68.x network.
In our network, the DMZ isn't routable back to internal, so we need to do some extra configuration on the Kemp itself.
We'll need to ensure that we don't have asymmetric back end routes, which occurs in two-arm setups, by enabling "Subnet Originating Requests". We'll also need to "Enable Non-local real Servers".
Both of the above settings are found in Systems Configuration > Miscellaneous Options > Network Options.
Put a checkmark for both Subnet Originating Requests and Enable Non-local real Servers
Next, we'll need to configure the WUI (Web User Interface) to be reachable from the internal NIC.
Navigate to Certificates > Security > Remote Access
Here, next to "Allow Web Admin Access" we'll use the drop-down box to select our Internal NIC, which on my system is eth0.
We'll then set the "Admin Default Gateway" to our Internal LAN Gateway on the 10.x.69.x subnet; this ensure we can still get to the WUI once we change our routes later.
**Note** Immediately after you change the Admin Default Gateway, you will lose WUI access, and the next step must be from the console.
Next we'll need to set the Default Gateway to the DMZ network, since our DMZ is not routable to the internal LAN.
**Note** This step requires console access because since we changed the admin gateway we lost WUI access. While in console, you will also need to reboot your device after changing the gateway.
**Note** The Default Gateway is a global setting, there isn't an option for setting it on each NIC.
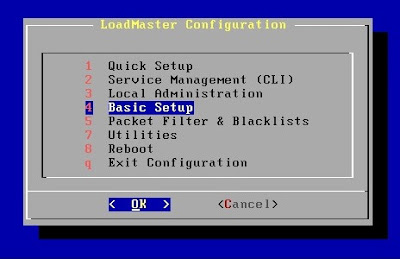
In the console, login to your LoadMaster, and navigate to (4) Basic Setup.
Next, we'll choose option (4) Default Gateway Configuration.
Here, we'll set the GW to your DMZ Gateway, in my case this is my 10.x.68.x subnet then TAB down to OK and hit Enter when finished.
Next select (q) return to previous menu. Back at the main menu select (8) Reboot.
Now, the last step is creating our new Virtual Services (VS) and Virtual IP Address (VIP) on the DMZ interface. This is done exactly like you configured your internal VIP and VS, by using the Exchange templates and existing Exchange cert.
Go to Virtual Services > Add New
Assign your Virtual Address (VIP) which will be on your DMZ subnet.
Give it a Service Name - this is not optional.
I added the word "external" to the service name that auto-populates: when adding another VS using the same template, because it will automatically try to use the same service name as the already configured internal VS and they cannot be the same.
In the Use Template drop-down, select Exchange 2016 HTTPS Reencrypted...the port will magically change to 443.
Click "Add this Virtual Service"
Go to Virtual Services > View/Modify Services, you should now see your second VS on the DMZ VIP.
In my example, my DMZ Virtual Services are on the 10.28.68.135 VIP and my Internal VS are on the 10.28.69.167 VIP.
Now we need to configure the new DMZ SubVS just like you did for you internal Virtual Services, and then assign your Exchange Certificate.
If you need a refresher on how to configure those SubVS and certs, follow Gareth Gudger's (SuperTekBoy) awesome post here; you'll just be doing the same steps but this time it'll be on the newly created DMZ Virtual Services.
Once you finish those settings, you're ready to test!
From an external machine try to hit your OWA, set up Outlook, and ActiveSync on your device...if your NATing and firewall rules are set correctly you should have no problems with external access.
Now to get less sleep since you can check email from anywhere!


No comments:
Post a Comment